
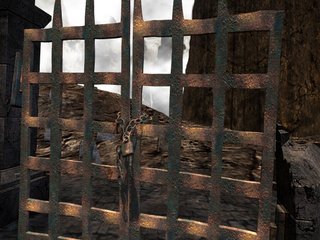
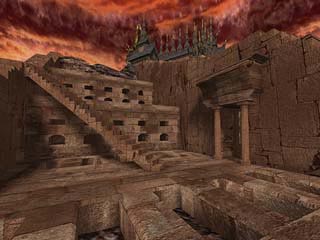
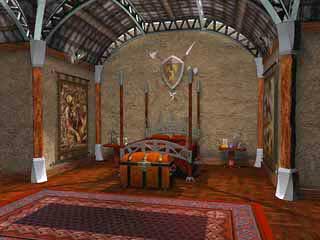
You begin the game in a barren landscape facing the Temple of Agrippa. If you turn around, you'll see that you are locked inside by the chains on the gate.
Now walk around the left side of the altar.
Go up the stairs with the grill in the middle.
Go through the left door.
Here you will find a mask with a flute-like instrument (on the right) and an intricate waterfall structure on the left. (Gee, you think this might be the way to get the Water element?)
Click on the mask and listen carefully to the tune it plays.
Now click on the waterfall structure. (There are seven ports on the structure; each will play a different note when clicked.)
Click on the 1st, 4th and 5th ports to recreate the tune that the mask just played, and you'll solve the puzzle. (See I told you a keyboard would be helpful)
Turn back around and head up the left staircase. (The right staircase ends in a brick wall)
Examine all of the pictures in this room; especially look at the order they are in.
They portray the early stages of the Planet Zork, starting with the Ice Age, and ending in the Tool Age.
Now click on the blue, hourglass object in the center of the room.
It will flip over, and turn into a chair.
The chair acts as somewhat of a transporter or time machine.
Sit down in the chair and spin around to the left.
You will notice that the window behind you will change to reflect the different pictures, and therefore give you a window into that time period. (You’d think that a TIME MACHINE would play a bigger part in the game than this? Oh well, I guess they thought that they played with one enough in Zork III)
Keep spinning until you get to the Tool age, and take the handsaw that you see.
Continue spinning until you get to the Ice age.
Use the saw to cut the large icicle into the bowl.
Now spin to the right (examining the bowl at each turn).
The ice will melt in the Volcanic, and summer ages.
Click on the water.
This sends you on the familiar trip back to the Alter.
Now you’ll see that there is a bowl of water on the Central Alter/Table.
Click the water into the Table, and then click on the Golden Halo to receive Sophia’s Message.
Walk through the doorway to the left of the planet.
Look down, and click on the shining thing in the dirt.
This is a Zorkmid coin, the official currency of Zork
Go ahead and pick up the coin. (Whoopee, you’re rich!)
Now go back through the openings and up all 40,000 stairs. (Amazing how powerful one mouse click can be isn't it?)
Surprisingly, the front door is locked. (Imagine that, a locked door in Zork!)
There is a small passage way in the ground to the right of the door.
Enter this passage. Become Ethereal. (How the hell you do that, I will never know)
You are now inside. (Congratulations!)
Insert your zorkmid coin into the donation box to your right. (Broke again!)
You will be given six cards with monk-like sayings on them. (I guess this really IS a monastery! Incidentally, if you’re feeling really selfish, you can open the box and retrieve your Zorkmid, but it won’t be useful anymore, and disappears when you go back to the Temple)
Remember these symbols, as they are important clues to the next puzzle.
Walk straight ahead where you will see six talking busts mounted on the walls. (If you think THIS is freaky, just wait until you see Sartorius’ place!)
There are four basins here, which contain a total of eight symbol markers.
Collect the six that match the ones on the cards you saw at the donation box.
Use your right mouse button to scroll and collect these markers.
Position yourself so that you are looking straight ahead (towards the double staircases).
Turn to your left and, starting with the first head (left-to-right), place the markers into the slots under the heads in this order: Shock, Anger, Boredom
Now turn to your Right and repeat the action with: Happiness, Femininity, and Intrigue. (Hold on!! before you put the last one in, get a piece of paper ready, and write down what order they speak to you in. The stuff they're saying doesn't matter, all you need to know what order those symbols just spoke to you in. This is an important symbol order)
Now go up the right-hand staircase and through the closed door (and smack right into a movie clip of a very deranged individual).
In the room off to the right, there is a grate in the floor.
Click on the grate a couple of times and then on the piece of paper. (This is an important clue to another future puzzle.)
The characters on the right correspond to the letters on the left.
You will need the code for the word "open" later (the first symbol on the second line, the first symbol on the first line, the last symbol on the third line and the second symbol on the second line).
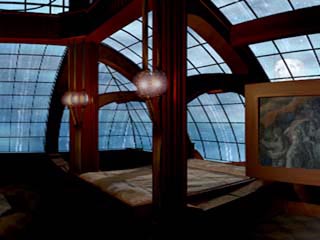
Exit this room and go straight ahead into the tower room, and up the wooden, spiral staircase.
Go up the stairs and through the doorway that is behind the large contraption.
Alexandria's room is down the hall, on the right-hand side.
Explore her room carefully to gain information and some interesting movie clip flashbacks of Alexandria and Malveux.
Now exit her room and go through the closed door at the end of the hall.
Explore this room carefully and take the magnifying glass from the left-hand counter.
Click on the hookah (cool word huh? Se I'm ejumacated.) for a video clip.
a Hookah 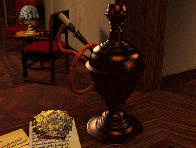 yummy
yummy
Now exit this section and go back to the machine at the top of the stairs.
Take a look at the chart on the wall.
The code for the seventh bell is missing.
You must enter the code for the seventh bell into the machine.
Here’s where you can use those symbols taken from the talking heads. (The statues, not the band)
Now go to the machine and enter the code. (Awe, what the hell, I'll just give you the order anyway: Anger, Intrigue, Femininity, Boredom, Shock, and Happiness)
A trapdoor will open in the ceiling, and a rope will drop down. (Supposedly the rope attached to the bell)
When you click on the rope, you will be pulled upwards very fast.
You must jump through the window while you are at the top.
Do so by clicking on the window (good luck if you’ve got a freakishly fast computer for the time period this game came out, I know it took me FOREVER to get it on my PIV-2500).
Once outside, walk around the balcony, and enter Malveux’s bedroom.
Make a note of the flame picture above the bed.
It is an important clue to the last puzzle in the Monastery (Blue, Yellow, Red, Orange, White).
Look at the photo and medallion on the small table by the door (video clip).
Check out all the books in this room for information on the Alchemists.
A book on the left bookcase is the trigger to the secret door (do not open the passage yet).
Place the magnifying lens on the book on the bed, so that you can read it.
These skulls are an important clue to a future puzzle.
The skulls are positioned in the 6, 9, 5, 7 and 3 o'clock positions.
Go through the secret passage by clicking on the book in the left bookcase.
Go up the staircase to the left and then follow the hallway around to the left until you get to the study room.
This room is chock-full of information on the history of Zork, and especially the story of Yoruk who had a flameproof shield.
Read all available books to get background information and a video clip.
Go through the door and the back left side of this room.
Walk straight ahead to the dial in the center of the room.
Spell out the word "open" by clicking on the appropriate buttons (Here’s where you use the glyphs from that piece of paper you pulled from the grate earlier).
The lock on the small gate (which is directly behind you) has opened.
Click on the gate to go downstairs to the museum.
Click on the rounded "basin" object in front of you.
To turn off the security system and open the secret passage, you must click on the lower right button.
Now take the ruby from Yoruk's Shield (beside the snake statue) and the unlit Torch of Endless Fire.
Go through the trapdoor in the floor in front of the Security control basin.
Click on each of the mummies twice to hear what they have to say.
(My what a fine time to SAVE YOUR GAME)
Go down the stairs to the right and through the door with the open gate.
Light the Torch of the Endless Flame by clicking it on the one on the wall.
Walk into the darkness of this room and place your torch into the holder on the right wall.
Open the casket, go inside and close the lid. (Yikes!)
Click your ruby on the inside of the casket's lid.
Take the real Shield of Yoruk and get the heck out of this casket.
Go back up the stairs and into the room with the lava floor.
Nemesis will create a wall of fire in front of you.
Click your shield on the wall of fire.
To your right, at the end of the passage, in a little nook, will be five skulls. (Oh boy, you get to use that information you got earlier)
The correct skull position are: First skull is O.K., second skull to 9 o'clock, third skull to 5 o'clock, fourth skull to 7 o'clock and the fifth skull to 3 o'clock.
The door behind you will open.
Go on through it.
To your left, on a shelf, will be a gold key, a silver drill bit, and a book.
Read the book to learn some more about the Quintessence.
Now click on the control lever beside the egg shaped, silver compressing machine.
Place your silver drill bit inside. (Don’t close it with the lever just yet)
Now open the small access panel, insert your key into the keyhole, and turn it.
Now pull the lever to close and operate the machine.
Retrieve your metal ball from the machine.
Go back to the machine with the basket, (towards the door) and place your ball of metal into the machines basket.
Now click on the counter weights to dunk your ball. (Kind of like golf eh?)
Take the now shiny ball and go back around to the opposite side of the room.
There is a pipe here with a flow control wheel connected to the lava pit in the center of the room.
Turn the wheel to allow the lava to flow. (What IS that pipe made of?)
Under the lion’s head are five flames.
Set them to the same colors as the ones seen in the bedroom.
From top to bottom they are: Blue, Yellow, Red, Orange, and White. (the white looks more like Lavender, but it’s still correct)
Place the ball into the lion’s mouth.
The molten metal will flow out into the pan at the bottom of the machine.
Cool it down with a blast of air from the attached bellows.
Oh LOOK! It’s the symbol for Fire!
Click on it to complete this stage of your adventure.
Click the metal into it’s corresponding position on the dial.
Click the blood pool in the center to learn how Malveux died.
Click on the yellow halo of light shining on his stasis chamber to hear what he has to say for himself.
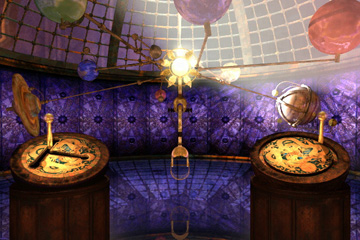
Head back to the planetarium.
On to the next planet and Sophia's Zorchestral Conservatory for Music. (If you're playing along at home the is!)
Walk through the ‘entrance’ (You will see to your left, that something has destroyed the ‘Real’ entrance.)
Continue through the closed door straight across the room (To your right) and then straight through to the back of the room. (Two clicks forward)
Go into the office (it’s the door to your left) and take the tuning fork from the small box on the table to the right.
Sit down at the piano, place the fork into the slotted block of wood near the keyboard and listen to the note it makes when clicked.
The note played is an E5 (the 16th white key from the right for you non-musicians)
Play the note.
You will hear the sound of something dropping.
Go around to the back of the piano and take the key from inside.
Sit down at the desk and insert the key into the lamp.
Turn on the lamp. (The string hanging down to the right of the lamp)
This reveals important instructions on the desk blotter. These will be used later, near the end of your Adventure in the Conservatory.
Search though the drawers of the desk to find some letters between Sophia and the other Alchemists.
There is a box containing an assortment of records beside the table.
Take the "Introduction to the Orchestra" and "Alexandria's Debuts Album" (The last two records in the box)
There is a book on the podium entitled, "On Music and Perfection"
This book describes four of the Z’Orchestral instruments. (They are also pictured in the Game Manual)
Exit and go back through the door you originally came in through. It’s labeled "practice." (Left of the Staircase)
Click on the phonograph machine to your right as you enter from the Auditorium Foyer.
Place the "Intro to the Orchestra" album on the turntable and wind it up a few times. (You've got to wind the phonograph every time you want to use it kids)
The switch at the bottom of your screen is the on/off switch.
The switch above it and to the left (which is hard to see) is the forward/reverse switch.
Turn the machine on by clicking the bottom switch.
Listen to the information about the various Z’Orchestral instruments.
Now wind it up again, flick the reverse switch and play the record backwards for a very interesting set of quotes from both Nemesis and Sophia.
Remove the record and replace it with "Alexandria's" album.
Pay special attention to the closing fanfare.
This fanfare is the whole reason that you’ve been learning about the Z’Orchestral instruments.
The instruments (in order) which are played during the fanfare are: Popperkeg, Nambino, Popperkeg, Wertmizer and Violin.
Remember this order, as you will have to use it later in the Conservatory.
Look at the picture on the wall on the other side of the door than the Phonograph.
This picture shows the proper Z’Orchestral position of the various Z’Orchestral instruments.
Go and stand on the stage, look at the floor, and pick up all eight instruments.
Now click on the stage again and place the instruments on the appropriate chairs according to their proper position in the Z’Orchestra.
Two chairs represent each Z’Orchestral instrumental position.
Once completed, you will hear a flashback between Sophia and Alexandria regarding the five ‘Sacred’ notes, C, D, E, B, and G.
You should remember these notes and their respective order, as they are integral parts in the concluding puzzle at the Conservatory.
Go through the door again and up the two flights of stairs. (Around to your left as you enter)
Go into the dorm bedroom. (Around to the right of the balcony, halfway up the hallway)
Alexandria's bed is at the far end of this room. (To the left)
Click on the scrapbook on her bed, and take the last page from the book.
Explore the books on her table and the music box on her dresser.
Look at the floor, and click on the floorboards to get some hidden letters Malveux, and Lucianne had written to Alexandria.
Exit this room and go into Sophia's bedroom. (To the right as you leave the room, at the end of the walkway)
Read the letters on her dresser.
Click on the bathtub behind the divider to get a steamy video clip of Sophia and Kaine.
Take a look at the book on the day bed.
Go back downstairs and click your poster (from the scrap book) over the billboard with the same picture (at the foot of the stairs), Therefore creating a ‘ghost’ performance of the entitled performance in the Auditorium.
Go to the ticket booth and take the ticket that is sitting in the tray.
Now go into the auditorium (large double doors to the right side, as you face the staircase) by clicking your ticket on the door.
The ‘ghost’ attendant informs you that you are in box “C”.
Go up the two flights of auditorium stairs to the mezzanine section; turn around to your left then up another flight of stairs.
Go down the hall and though the door marked "C" and sit down.
Click on the opera glasses to see Alexandria’s performance.
Go back downstairs and into the main auditorium room.
A random member of the audience will shout for the playing of the Conclusive Fanfare (See I told you you’d need to know it)
Walk up to the podium in the Z’Orchestra Pit, pick up the baton and conduct the fanfare. (With the lights all out, it might be a good idea to turn up the brightness on your monitor, so you can see a little better)
Remember the positions of the Z’Orchestral instruments.
To play the fanfare, click on the correct positions for the Popperkeg (Far right | Top row), Nambino (Second from left | Bottom row), Popperkeg a second time, Wertmizer (Far left | Top row) and Violin (Far left | Bottom row) in that order.
Go through the stage door after the lights come on.
Read the note on top of a crate to the left.
There is an opening in the backdrop curtain.
Go into the small control room.
Look at the clipboard to the right.
Each photo represents a backdrop.
Your objective is to create a passage though the opening in the many backdrops, to the back of the room.
Start the machine (big red button) and then use the blue buttons to control the backdrops. (You ever wonder if the Zork creators had something about colored buttons?)
Note that the first button is burnt out.
Press the 2nd, 3rd, 4th and 6th buttons to open the way.
Go through the passage.
Once through, go down the stairs. (Point toward the control room)
Get into the swan (Never thought I’d be saying THAT) and use the lever.
Once you have been raised to a higher place, Jump onto the drum opposite the swan controls.
You will break through both drumheads and fall through the floor to the furnace room below.
Look down and click on the porthole in the floor then on the locket.
This is a PERFECT time to save the game! You’ll see why if you take too long in the next area.
The idea is that you have to jump down into the water, and retrieve the lost locket.
Be careful, you don’t have really strong lung capacity.
Once you jump in, look down; grab the locket and then head through the elevator door. (I know you’re not supposed to use an elevator in an emergency, but in this case, the door reveals a staircase!)
You will emerge from the stairs into Sophia’s secret lab. (Only a musician would make a barren cave into a secret laboratory)
Look at the map of the lab on the wall behind you.
Each crystal on the map is related to a single sacred note.
The crystal for the note "G" is not on the map.
I guess you’ll just have to make one.
Go through the door into the boiler room. (Somehow you can squeeze through that tiny opening)
Look at the gauges on the wall.
Notice that the second gauge won’t stay open for very long.
I guess you’ll need something to hold it open with.
How about that locket you’re holding. (Yeah, yeah, I know it seemed more important than that, but what can I do, it’s a ZORK game!) (These are the people who had you GIVE the Precious Jewel Encrusted Egg TO the THIEF to have him open it for you in Zork I)
Go back into the crystal lab through the tiny little door.
Take one of the small green crystals from the hole in the wall.
Now click on the green crystal statue and take the disk that emerges from its “mouth”.
Throw the disk into the bubbling vat in the center of this room followed by your green crystal.
Now go get another disk from the statue and throw it in too.
You have now created your "G" note crystal. Don’t you feel special?
Refer back to the map on the wall, and hit the crystals in the sacred order (C, D, E, B, G). (I guess they’re just aTUNED to their purpose...)
C and D are next to the hole you got your green crystal from.
B is just past the green statue structure (not the one beside it).
G is the crystal you created in the vat. (This really isn't AC/DC is it?)
Click on the Metallic symbol for Water. (This transports you back to the Temple of Agrippa)
Once you land, click the Water symbol into place on the dial, and click on the “Blood” in the center to learn how Sophia died.
Click on the halo of light shining on her stasis chamber to hear what she has to say. Irondune, here we come!
Click the lever to go down.
Go down the stairs to the right to reach the first landing, where you will go up another set of stairs to your right again in order to reach Kaine's bedroom. (The doorway directly in front of you, at the top of the stairs)
Click on the desk on your left when you first enter the room.
Open the left hand drawer and take the vial of nitro.
Read the note in the drawer that reads, (Begin ominously vague ghostly voice) "three are blind and two can see."
Remember this, as it is a clue to the solution to a puzzle you will see later in Irondune.
Look in the other drawer to find a picture of Sophia, and some letters.
There is also a letter stuck on the spike and another stuck with a dagger.
There are also notes, letters, photos, and books on the tables on either side of the locked door on the other side of the room, as well as on the bed.
Now, let’s turn out attention to the locked chest at the foot of the bed.
You can blow open the lock by placing the vial of nitro into it.
Open the chest, and look at the maps and the letters.
The red map holds important information to a future puzzle. (Notice the kinky shackles on the bed!)
Exit the bedroom and go up the stairs to your left.
Pass up the games room for now, and go down the far staircase to Lucien’s bedroom. (To the left of the staircase)
Once inside, read the letters from Alexandria and Kaine located on the desk. (Also of note is the ticket that you receive during the Conservatory quest.)
Click on the small paint-covered table beside the paint easel (video clip of Lucien painting a nude of Alexandria, while Kaine asks if it is his imagination or his memory, dirty old man)
Now let’s take a look at the easel itself.
Pick up the paintbrush and uncover the message by holding down you mouse button and wiping the canvas clean.
These are the radio codes that you will need to know later on in this area.
They are: 1.) Build bridge, 2.) Ambush, 3.) Dig trenches, 4.) Latrine cleaning, 5.) Coup d'etate, 6.) Infiltrate and destroy, 7.) Serve mess, 8.) Burn and pillage, 9.) Split the troops, 10.) Distraction, 11.) Drop thaddium and 12.) Verify message.
Now go over to the wardrobe by the bed.
Look down at the floor, read the note and take the gunpowder.
Leave Lucien’s room, and go downstairs to the main floor. (Next to the cannon)
Go through the door on the center wall that goes under the stairs.
To your right is a broken sword handle that you need to take.
Walk to the fireplace in this room and click your sword handle to the base of the blade on the mantel to see a video clip of Kaine picking on Lucien to the point where he says that he might try Alexandria out for himself. This makes Lucien leap on top of his father and hold a sword to his neck, making Kaine shout, “Finish it!!” (You need to click it to the left of the blade, where the handle would attach. If you click on the blade itself, nothing will happen)
Take the sword and leave the room. (How about that, you do actually get to hold a sword in this game)
Click on the large door directly in front of you on the center wall.
You will see a movie clip with an old soldier. (There are several video clips here, but seeing the first one is enough to proceed with the story)
Go into the doorway at the foot of the right-hand staircase.
The suit of armor here is missing something. There is no sword in its scabbard. Place your sword into its scabbard. (Oh well Kaine told Lucien that any empty one would do.)
This causes the door behind you to open.
Go inside and check out the stained glass figures.
Now, you must remember the note that you found with the nitro earlier, in Kaine's room.
The note said, “…three are blind and two can see...”
You might notice that two of the figures’ visors are down. (Making them ‘blind’)
Your objective now is to adjust all of the facemasks of the suits of armor in the castle to match those displayed in the glass (opened or closed).
Open the facemask of the suit at the foot of the stairs with the red pantaloons.
Close the facemask of the suit outside of Kaine's bedroom (has a football style mask)
Open the facemask of the suit outside of Lucien's bedroom (has a blue Mohawk).
You will hear a passage door open from somewhere in the castle.
It’s the locked door inside the Weapon’s museum. (Where the stained glass is)
Go to the dungeon and look at the drawings on the walls of the open cell. (Somebody was holding great vengeance for Kaine)
Enter the torture room. (In this room, you will discover how Kaine extracted the radio codes from the enemy soldiers. Yuck!)
Click on all of the torture devices to get more information about the radio codes.
Go back into the large room where you found the sword.
Just inside the doorway, to your right is a metal dog shaped "statue."
This is actually a miniature cannon .
.
Zoom in on the dog and then click on its ear. (This loads its ammo of metal bones, how cute…)
Now click on his backside (not the tail just yet).
Zoom inside and deposit your gunpowder on the base of the cannon.
Back out, close his backside, and pull his tail.
The bones will be projected across the room and break down the barricade on the doorway on the other end of the room
Let’s go see what’s in there.
When you first enter, you will notice six display tables here.
They are animated models of great battle that Kaine must have been studying.
Starting from the left, click on each one (skipping the table marked “Battle in Progress” for now) and then on each of the red buttons inside to get information about great war strategies.
Once you have seen all of the miniature reenactments, open the fifth table and relay your battle plan to the old soldier by entering the appropriate radio codes.
The correct code is as follows: 10, 1, 9, 6, and 12. (This code is also printed on the inside, front cover of the Zork Nemesis game manual. Don’t you just love in-game copy write protection?)
Go back upstairs to the games room that you skipped earlier.
Take a look at the sign on the wall by the pool table.
Note the "fishing in the desert" entry.
Zoom in on the pool table.
Press button #3 and then button #5.
Look at the ball recovery bay (on the side of the table) after the shot is made.
Make a note of the numbers shown.
This is an important clue to a future puzzle.
The code is 7, 4, 1, 9, 5, and 3. (What a cool way to keep commands and passwords secret!)
Now exit this room and go to the weapons museum room.
Wow! You’ve gone a DAMN long way without SAVING haven’t you?
Go to the "Age of Kaine" display. (I want to have an Age named after me!)
(IMPORTANT!! You must do all of these steps very quickly, or you will go BOOM!!)
(I would suggest reading all of these steps now, and then doing them from memory, so you don’t sit waste time looking up the next move)
Click the red light on the bottle shaped object then on the cylindrical object.
Take the thaddium from the cylinder and put it in the bottle.
Close and take the bottle.
Exit the room and go out the door where the old soldier talked to you.
Get into the tank, open the lid of the purple canister, place your bottle inside and close the lid. (Ok, you can relax now that the crisis has been averted. That is, IF you made it this far)
Click on the control pad and enter the code from the billiard balls (7, 4, 1, 9, 5, 3).
Click on the joystick. (Hey! I’ve got one of those)
The tank will drive itself into a cave opening.
Now go to the large machine in the room and enter the earth symbol by first clicking on the corresponding area to the right and then on the main display. (1st plate to top right display corner, 2nd plate to top left, 3rd plate to bottom left, fourth plate to bottom right).
Pull the lever and take the mold.
This might be a good time to SAVE again.
Now go through the door and pull the lever down, ignoring the warning about non-protected individuals.
Zoom in on the control unit to the right and then click on the large red button.
Press the left six buttons
When you back away, you should hear a message stating that the furnace is at optimum heating level.
Go to the large machine and insert your mold. (On the left side)
Now press the "arm" button and then the "fan" button.
Click on the metal symbol for Earth.
Here comes that good ole’ trip back to the Alter at the Temple of Agrippa.
Click the symbol into its place on the table, and click the blood pool center to see Kaine bite the big one. (HOORAY!)
You can now hear the great general Kaine pleading with you to save Lucien by clicking on the golden halo pointed at his stasis chamber.
It’s time to head to the last planet, home of Sartorius’ Asylum for the insane. (Sounds like my kind of town!)
Go inside and walk around the circular walkway to your left.
Go into the file room (First door on left) and read all available files.
Zoom in, and then click on the flashlight to watch a video clip of Sartorius inspecting the heads of his patients.
Go into the room with the mounted heads. (Hold on, it’s just going to get sicker!)
Take the safe from the reach in freezer. (To the left of the door)
Go to the x-ray machine (To the left of the heads) and place the safe into the machine's square opening.
Pull the lever and look at the safe.
You will see the numbers "~~~20-18" and a key, as well as something that looks like a steak. (MMMmm, Yum!)
Turn off the machine and exit the room (you can just leave the safe where it is).
Go to the elevator, (Don’t forget to close the door) and press the "B" button.
Now (open the door and) exit.
Welcome to the morgue.
Well, if you noticed earlier, there was an opening on the shelf with the heads.
I guess we’ll just have to find one here in the morgue.
Too bad it’ll have a body still attached, but something tells me that by the looks of this bloody machine in the middle of the room, that won’t be a problem.
I’ll bet that you can find a corpse with an attached head in one of the available drawers.
I might just happen to know that on the right-hand side of this room, on the second row down, four drawers from the far corner, there is a fine specimen. (Yikes! I think I’m getting TOO into this)
Take the body and drop it into the machine in this room.
Go to the controls and pull the levers from left to right, in order.
Retrieve the head from the bowl (well, this just gets more and more gross don’t it?)
Go to the elevator and back up to the first floor.
Go into the room with the heads and place the one you're carrying on the available spike. (The claws will reach up and grab onto the neck skin.)
Press the buttons to make the head perform various emotions. (Damn, I love this game!)
You can also get the first three numbers of the combination to the safe, if you pay good attention.
Make note of the numbers he tells you, when he thinks you’re ‘cute’.
They are 36-24-36.
Go back to the machine with the safe.
Click on the top of the close up of the safe to get a different perspective, which will allow you to turn the dial.
Enter the code, which the head gave you plus the 20-18 that you saw under the x-ray.
The full code is 36-24-36-20-18.
Take the bucket from the safe and place it in the arm of the machine on the far side of the room.
Retrieve the key from the liquid. (I bet you've been just itching for a chance to stick your hands into a bowl of BLOOD all day!)
Exit and go back to the elevator.
Close the door and insert your key into the 20th floor slot.
Go to the 20th floor.
Note that there is one open and one closed door (which is pulsating) on this floor.
Remember their proximity to one another.
Go through the open door and explore the contents (do not touch the chair yet).
You will see a video clip when you click on the needle on the gurney.
Try walking towards the door by the chair.
A crazed doctor will greet you.
What a nice time to SAVE YOUR GAME
Sit down in the chair.
You will get zapped, and they you TOO will be pulsating.
Quickly exit this room and enter the room with the closed pulsating door in the hallway (you must be pulsating to enter).
Take the elevator up and explore Sartorius’ little museum.
Take the doctor’s mallet from the display case box in the center of the back wall.
There is a small model of the asylum to the left of where you got the hammer.
Click on the base of this model so that an opening appears in the roof. (Notice the great big screeching noise)
Walk though the second door.
Notice that the access panel is short-circuiting. (Now, I know you’ve been shocked once, but I don’t really think you’re going to want to be pulsating in this next room, so let’s just get somebody ELSE’S hand to press the buttons)
Walk around this circular room until you get to the display with the hand and forearm.
(You can press the various buttons in the displays to see some sick things if you want)
Break the glass with the doctor’s mallet and take the arm.
Nifty time to SAVE YOUR GAME
Use the hand to press the buttons on the short-circuiting control pad. (Where’d you learn that code anyway?)
Climb the ladder. (If the ladder is not fully extended (you can not reach it) go back and press the model's base again.)
Click on the strange shaped sink and fill it with water.
Once filled, drain the water by pulling the lever.
This starts up the batteries.
Now go to the large machine with the glass sphere.
The oxygen lever should be to the left and the hydrogen lever to the right. (You can find the Oxygen and Hydrogen tanks by clicking on the forward arrow in the sphere close-up)
Give it a blast of helium and pull the lever. (Ooh! Fire!)
Now put the oxygen lever to the right and pull the lever. (Ooh! A Metal symbol!)
Now, as I know what happens when you return to the Temple with all Alchemists now revived, I think that this would be a good time to SAVE YOUR GAME, don't you?
Give it one last blast of helium, touch the metal, and take yet another route back to the Temple that Agrippa built.
First off, DON’T drink from the Damn cup! (Why would these four Alchemists give YOU the first taste of their life’s work?)
Oh look, it turns out that Ole’ Lucien was the Nemesis himself.
Click on the ring Lucien throws to you to find out how Lucien killed all of the Alchemists.
Go into the middle of the courtyard and turn off the flowing water by clicking on the right horn of each fountain.
Now click the ring on the Copper Scarab in the fountain.
Go through the newly opened passage (Automatic) and go though the Eye-shaped portal into the Tomb of Alexandria.
Click on the casket with your ring, (You’ll have to walk around to the other side of the casket to be allowed to select it,) watch her start to move, and then click on the now apparent Silver Ring on the bosom of the casket.
You should now have a gold and silver ring. (One item)
Put the rings in the dragon's dish and click on his triangle. (The first statue on the right, as you entered the room.)
Take the metal and place it in the elephant's dish. (The next one around the room, counter-clockwise)
Click on his triangle.
Now place the metal in the snake's dish. (First statue on the left, as you entered)
Click on his triangle.
Now take the metal and place it in the large beast's dish. (Only statue left)
Go stand in front of the elephant figure (so that your back is to him) and look up.
There will be a small earthquake and a wand will knock loose from the ceiling.
Take the wand and place it in the beast's hand.
Take the completed symbol for the Quintessence (Love, awww how sweet). (You will now be transported to the walkway over the alter in the main room of the Temple)
Now click over the edge of the walkway to where the alchemists are. (Over the left-hand side)
Click the symbol for the Quintessence on Alexandria’s spirit.
Watch the Alchemists vaporize (You will automatically run up the walkway, and jump out of the front door of the Temple, to where Lucien and Alexandria meet you, and invite you to accompany them)
Exit through the gate, turn around and click on the picture to end the game.
HOORAY!!!! Congratulations!
| In the library of the Temple of Agrippa, there is a knife that glows blue on a table. Could this be made of the same Elvish steel as the Grueslayer from the first three Zork games? If it is, why does it glow blue when YOU are near it? Maybe it belongs to the alchemists, and it sees YOU as an enemy. | |
| You can find the Torch of the Endless Flame from Zork I, the wand from Zork II, and the sheath of the Grueslayer from Beyond Zork in the museum at the Monastery. | |
| You can see the coronation portrait of Dimwit Flathead painted in 783 GUE by his brother Leonardo from the Flathead Calendar that came in the Zork Anthology box. In it was compiled Boswell Barwell’s exhaustive biography, “The Lives of the Twelve Flatheads” | |
| Sartorius has the portrait of Thomas Alva Flathead in HIS museum. This portrait is from the same collection as Lord Dimwit’s | |
| In the historical war simulator at Irondune, there is a simulation of “The Battle of Flood Control Damn #3. In it, the narrator says that the battle was won using matches that Kaine found in the damn’s lobby. (The place where you found them in Zork I) | |
| There are a couple of places where you can find various Zork: The Grand Inquisitor artifacts. |
The following cheats will only work AFTER you finish the game once.
* Type "309newdorma" from any area of the game.
* Start a saved game.
Once started, select save from the menu. Erase the name of one of your saved games and type in either "hello sailor" or "chloe."
any questions or commants? corrections? was I too stupid to bear? Just E-Mail me: saint_ruckus@hotmail.com